In this article, we will discuss how to implement Google reCAPTCHA in Angular. Google reCAPTCHA is a free service provided by Google to protect websites from spam and abuse by humans and bots. It is used to verify whether a user is a human or a bot. reCAPTCHA uses advanced risk analysis algorithms to distinguish between humans and bots. Angular is a popular JavaScript framework used for building dynamic web applications. reCAPTCHA is a free security service developed by Google that helps protect websites from spam and abuse. It uses advanced risk analysis techniques to distinguish humans from bots. This technology enables websites to protect themselves from abusive traffic while allowing legitimate users to pass through with ease.
reCAPTCHA comes in two types: reCAPTCHA v2 and reCAPTCHA v3. reCAPTCHA v2 is the most widely used and requires the user to click a checkbox to prove that they are human. reCAPTCHA v3, on the other hand, is a newer version that uses a score-based system to determine if the user is human or not, without the need for any user interaction.
Google reCAPTCHA with Angular forms:

reCAPTCHA, which stands for Fully Automated Public Turing Test to Tell Computers and Humans Apart, is a form of Human Interaction Proof. It is owned by Google and offers a variety of options, such as typing a word or selecting photos that match, to do reCAPTCHA validation. It functions as a sort of challenge that aids in identifying actual users and the computer programs that they utilize.
Let’s look into how to add reCAPTCHA validation to your application using the Angular framework.
Step 1- Create your own project:
You can add this to your existing Angular project or if not you can create a new project using:
ng new your_project_name
It is necessary to open the project and the terminal after the Angular project has been successfully created.
Step 2 - Install the ng-recaptcha package:
In order to add
CAPTCHA validation to your project it is necessary to install “NgxCaptchaModule” to the existing
project. Therefore open your terminal and use this command:
npm install ngx-captcha --save
Step 3 - Add the reCAPTCHA widget to your form:
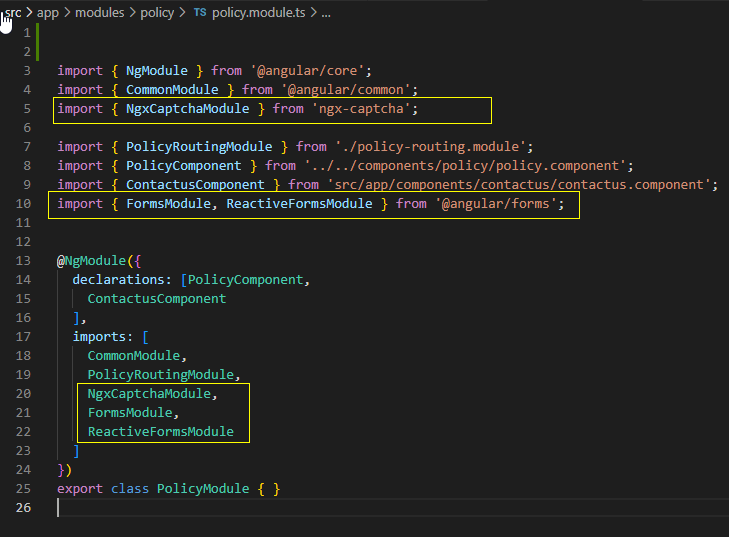
Then we will import “NgxCaptchaModule” to the src/app/modules/policy.modules.ts.
It's important to remember that we usually employ CAPTCHA validation in forms. As a result, we must use the "ReactiveFormsModule" and "FormsModule" to implement an Angular form. Be sure to import "ReactiveFormsModule" and "FormsModule" for that reason into the app/modules/policy.modules.ts.
Step 4 - Create a form page:
Here, we need to create a form in the app/components/contactus.component.html, where we have added captcha validation.
<form [formGroup]="aFormGroup">
<div class="form-group">
<label for="inputName">Name</label>
<input type="text" class="form-control" id="inputName" placeholder="Enter name">
</div>
<div class="form-group">
<label for="inputEmail">Email</label>
<input type="email" class="form-control" id="inputEmail" placeholder="Enter email">
</div>
<div class="form-group">
<label class="col-form-label">Phone:</label>
<input formControlName="phone" type="text" class="form-control" placeholder="Phone">
</div>
<div>
<ngx-recaptcha2 #captchaElem
[siteKey]="siteKey"
formControlName="recaptcha">
</ngx-recaptcha2>
</div><be>
<button type="submit" class="btn
btn-primary">Submit</button>
</form>
Step 5 - Handle the reCAPTCHA response:
Here, we have to add the following code given below into contactus.component.ts for the exact response from reCAPTCHA.
import { Component, OnInit } from '@angular/core';
import { FormGroup, Validators, FormBuilder, FormControl } from '@angular/forms';
@Component({
selector: 'app-contactus',
templateUrl: './contactus.component.html',
styleUrls: ['./contactus.component.scss']
})
export class ContactusComponent implements OnInit {
private subscriptions: Subscription[] = [];
public aFormGroup: FormGroup;
submitted = false;
constructor(private formBuilder: FormBuilder, private blogService: BlogService) { }
ngOnInit(): void {
this.aFormGroup = this.formBuilder.group({
name: ['', Validators.required],
email: ['', [Validators.required, Validators.email,
Validators.pattern('^[a-z0-9._%+-]+@[a-z0-9.-]+\\.[a-z]{2,4}$')]],
phone: "" ,
message: ['', Validators.required],
recaptcha: ['', Validators.required]
});
}
}
STEP 6 - Create a Google reCAPTCHA Account ( API Key ) :
Under the ngx-recaptcha2 tag in app.component.html, there are several parameters you can customize. But in this case, we need only the “siteKey” and “formControlName”. In your app.contactus.component.ts, import the necessary modules and create the necessary variables.
To use Google reCAPTCHA in your Angular application, you need to first create a Google reCAPTCHA API key. Follow the below steps to create it:
Go to the Google reCAPTCHA website at https://www.google.com/recaptcha/admin/create.
Click on the "Get reCAPTCHA" button.
Sign in with your Google account if you are not already signed in.
In the "Register a new site" section, enter a label for your website and select the reCAPTCHA type that you want to use (reCAPTCHA v2 or reCAPTCHA v3).
Enter the domain name of your website and click on the "Create" button.
Once you have created the API key, you will be provided with a Site key and a Secret key. You will need these keys to implement reCAPTCHA in your Angular application.
When you are going to get the site key, it is needed to fill in the following mentioned fields.
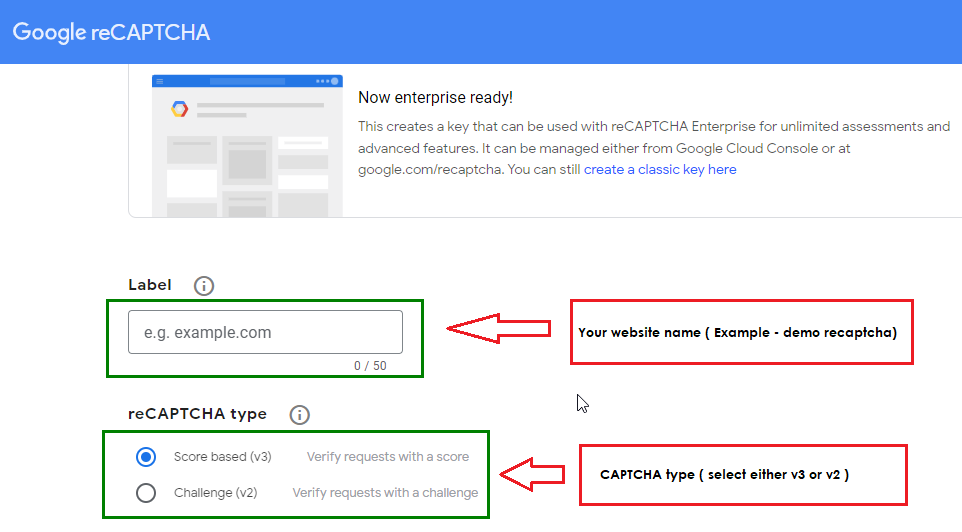
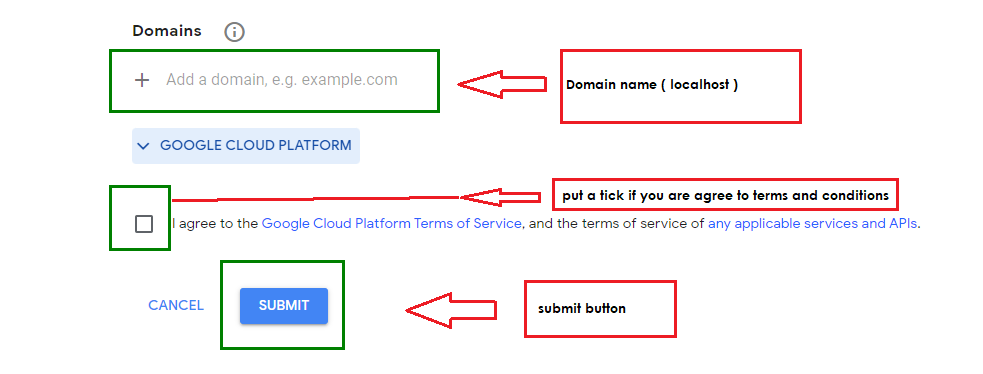
Here you have to provide your website name as the label. Then need to choose either the v3 or v2 version of Google reCAPTCHA validation. After that provide localhost as the Domain. Then put a tick if you are agreed to the Terms and Conditions provided by Google reCAPTCHA. Then click the “Submit” button.
Then you will redirect to the page that has the “siteKey” and copy the key.
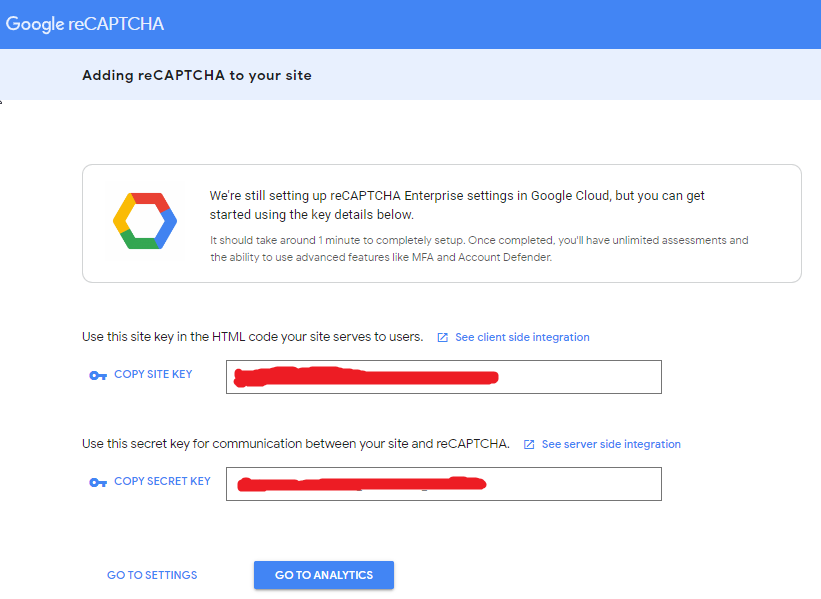
Then let’s move on to contactus.component.ts file and paste the site key by creating an instance of the site key.
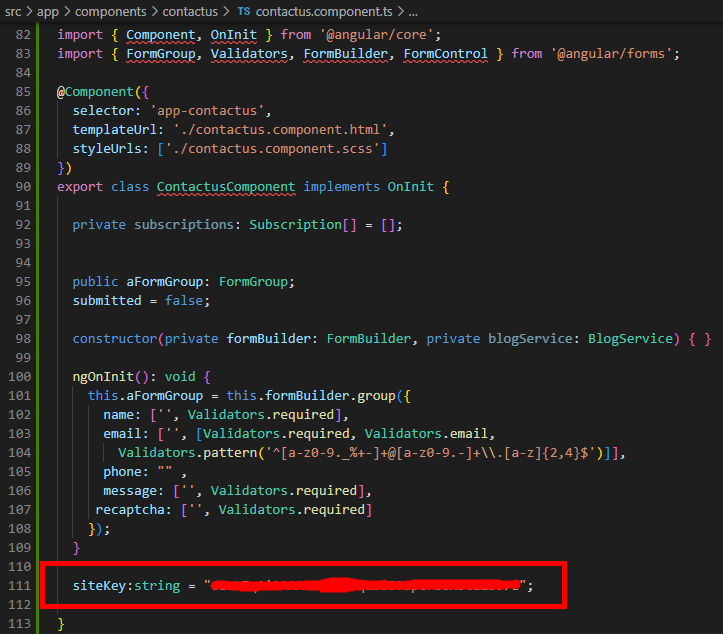
Now, Run the project after saving all the changes. You can see that the CAPTCHA validation is present on your Angular web page. Following that, you can create your form fields and carry out other form implementations. The submit button might be disabled until the CAPTCHA response has been verified. You can disable the submit button of the form you generated by adding the following code to the contactus.component.html file. (This button has Had Bootstrap styling added.
<button [disabled]="aFormGroup.invalid" type="button" class="btn
btn-primary">Send message</button>
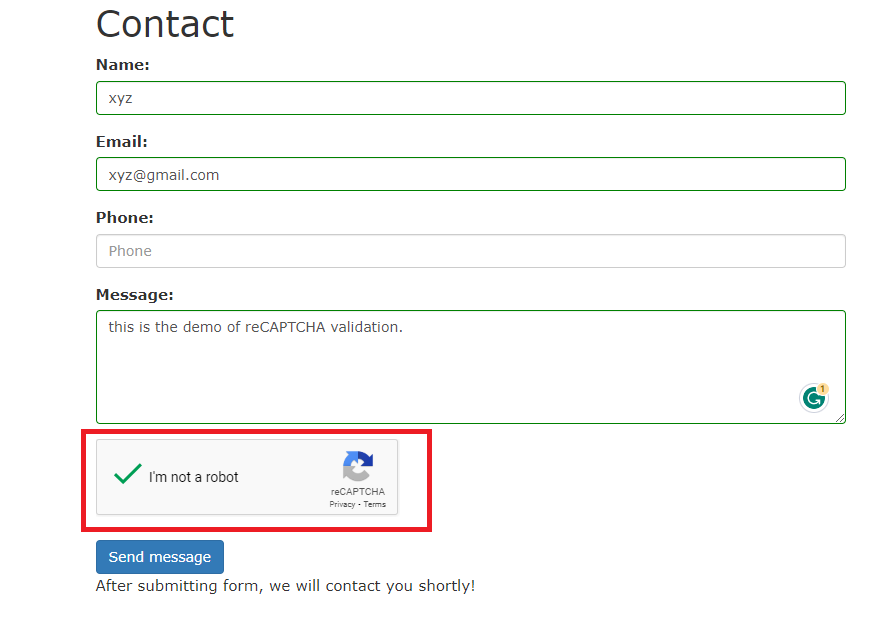
By doing the above steps you can successfully create an Angular form with reCAPTCHA validation. As you can see, here is the output after implementing reCAPTCHA in the angular contact us form.
Output:
Conclusion:
In conclusion, implementing Google reCAPTCHA in an Angular application can help protect against spam and abuse. By following the steps above, you can easily add reCAPTCHA to your Angular form and verify the user's response on the server. That's it! With these steps, you can easily implement Google reCAPTCHA in your Angular project and secure your forms from spam and abuse.
Hope you enjoyed reading this article and found it useful. Please share your thoughts and recommendations in the comment section below.

Share This Post
Support Me