This article will demonstrate how to use the ASP.NET Core framework to create a well-structured RESTful API for a situation that is close to real-world usage. To make the development process simpler, we'll go over some popular patterns and techniques. We will go over the ASP.Net Core Web API's HTTP Get, Put, Post, and Delete verbs in depth. These ASP.NET Core Web API verbs have a lot of importance. This article demonstrates how to use the ASP.NET Web API to carry out these 4 verbs.
What is REST API?
* "What is API " ? …is the first thought that enters our head.
Application Programming Interface is referred to as API. It is an intermediary software agent that enables communication between two or more programs. APIs are mechanisms that enable two software components to communicate with each other using a set of definitions and protocols.
* Now the next question is: "What is a web API ? ".
Asp.net Core web API is a cross-platform web API. A web API is an application programming interface for a web application or web server, to put it simply. To access data, clients and websites communicate using the HTTP protocol.
Why Web API is required?
Web API enables the creation of HTTP services to communicate with client entities like browsers, devices, or tablets. The user wishes to use several platforms, including mobile, browsers, Google devices, etc., to access the application. Web API may be helpful in this situation.
The Web API will answer in JSON and XML format requests from various devices. The most common formats found in modern APIs are JSON (JavaScript Object Notation) and XML (Extensible Markup Language). Built-in support for JSON, XML, BSON, and form-URLencoded data is included in Web API. It denotes the automatic conversion of request and response data into certain OOB formats (out-of-the-box). Most gadgets can comprehend JSON output. We require more effective methods for delivering data from servers to clients, independent of technology and server stacks, due to the growing variety of clients (including mobile apps, browser-based SPAs, desktop apps, IoT apps, etc.).
These issues are fixed via REST APIs. Representational State Transfer is a shorthand for this. Applications can communicate with one other using the lightweight JSON format thanks to HTTP-based REST APIs. They operate via web servers.
The following entities make up REST:
Resources are distinct, recognizable objects (for example data from a database, images, or any data).
Endpoint: A URL identification can be used to access a resource.
The type of request a client submits to a server is known as an HTTP method. The actions we take with the resource should adhere to this.
What are HTTP Methods:
Every time a client sends a request to a server, it includes an HTTP method that specifies what the client wants the server to do with the requested resource. These requested actions are represented by HTTP methods. Typical HTTP methods, for instance, can obtain data from a server, send data to a server for processing, delete something from the server's data store, etc.
The term CRUD, which stands for Create, Read, Update, and Delete, can be used to summarize a major percentage of program functionality. Each of these actions has a corresponding four HTTP method, as follows:-
C -
Create – POST
R - Read - GET
U - Update - PUT
D - Delete - DELETE
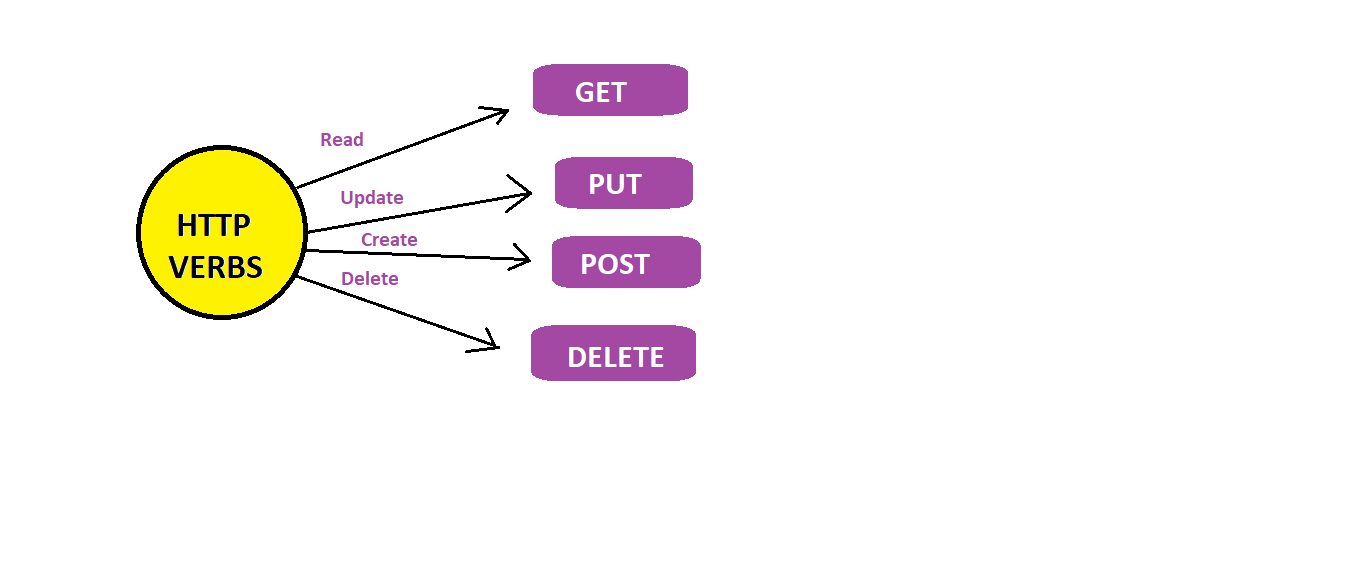
The only HTTP methods we should utilize for the vast majority of applications are GET, POST, PUT, and DELETE.
Create an Asp.Net core web API Application:
Let’s create a new ASP.Net Core Project using Visual Studio 2022 Community Edition.
Step 1: Open Visual Studio 2022 Community Edition which is free to use.
Step 2: Click on “Create a new project”.
Step 3: Select “ASP.NET Core Web API” from Project Templates and click on “Next”.
Step 4: Give a Project Name, Select the location and click on “Next”.
Step 5: Select Framework as .Net Core 3.1 or .Net 6.0 and if you want to send or receive a request over HTTPS then select the checkbox “Configure for Https” otherwise uncheck the same.
Step 6: If want a default Docker set up for your application then check the “Enable Docker” as well and then click on “Create”.
Please Note I have selected .Net Core 3.1 as the Framework and the code examples given below are done in .Net Core 3.1 so there will be some code changes or structure changes if you select .Net 6.0
Crud Operations in Asp.Net Core Web API:
Here, we will implement different action methods in the Web API. Examples of several techniques with usable code are provided below.
First, we will create a Model class called Category.
namespace WebApplication1.Models
{
public class Category
{
public int Id { get; set; }
public string Title { get; set; }
public int DisplayOrder { get; set; }
}
}
After that, we will create a Controller called CategoryController.
We created one static variable with the type of list in this controller and puts some values into this variable. As demonstrated below, CategoryController appears.
using Microsoft.AspNetCore.Http;
using Microsoft.AspNetCore.Mvc;
using System.Collections.Generic;
using System.Linq;
using WebApplication1.Models;
namespace WebApplication1.Controllers
{
[Route("api/[controller]")]
[ApiController]
public class CategoryController: ControllerBase
{
public static List<Category> listofCategories = new List<Category>
{
new Category {Id = 1, Title = "Samsung", DisplayOrder = 1 },
new Category {Id = 2, Title = "Vivo", DisplayOrder = 2 },
new Category {Id = 3, Title = "Apple", DisplayOrder = 3 },
new Category {Id = 4, Title = "Oppo", DisplayOrder = 4 },
new Category {Id = 5, Title = "Realme", DisplayOrder = 5 }
};
}
}
}
Let’s look at the implementation of different methods in the Controller.
GET Method with example:
GET Method: In APIs and webpages, GET requests are the most frequent and commonly utilized technique. The GET method is used to retrieve data from a server at the specified resource, to put it simply. Let's take an API with a /category endpoint as an illustration. A list of all accessible categories ought to be returned by sending a GET request to that endpoint.
This is the way to fetch all data from the GET method.
"/api/category" GET --> Fetch all categories.
Code :
namespace WebApplication1.Controllers
{
[Route("api/[controller]")]
[ApiController]
public class CategoryController : ControllerBase
{
[HttpGet]
public IEnumerable<Category> Get()
{
return listofCategories;
}
}
}
Now let’s test it.
To start our application we will go into visual studio and we will run our code. Once we will start debugging we get the data as it’s mentioned below screen:

Let’s move on to test API through Postman.
Test Api Endpoint using Postman :
Let's test our endpoints using Postman. This tool is useful for testing RESTful APIs.
Open Postman and
dismiss the welcome messages. You’ll see a screen like this one, And here we
will use the GET method according to our needs, then Type the API address into theEnter request URLfield.
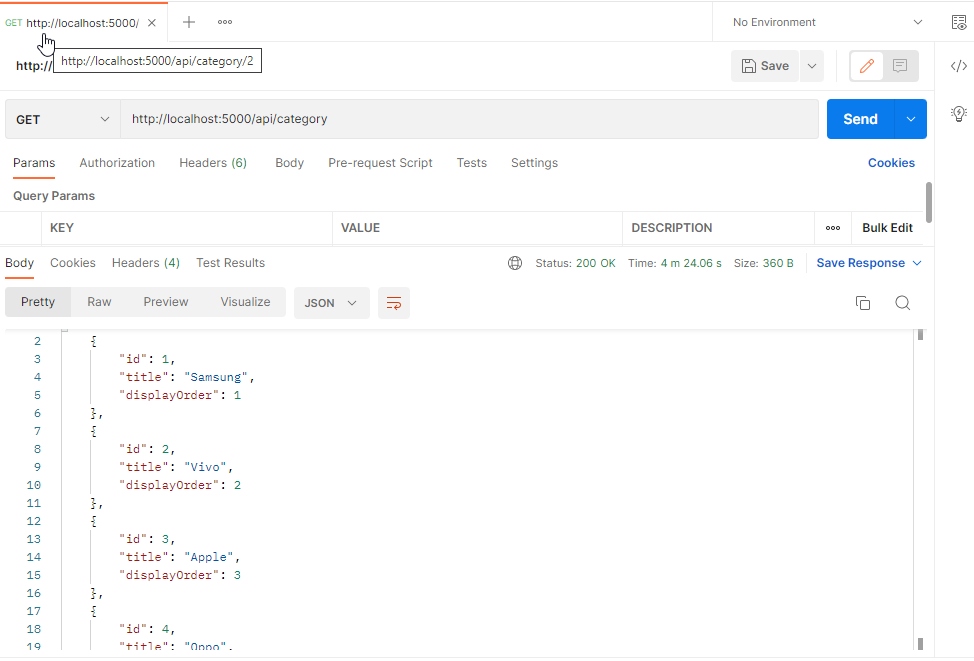
We will paste our URL just like this: http://localhost:5000/api/category.
Once we’ll Click theSendbutton. We’ll
receive an output like this:
Output:
This is the way to fetch specific Id data from the GET method.
"/api/category/{categoryId}" GET --> Get specific category.
Code:
namespace WebApplication1.Controllers
{
[Route("api/[controller]")]
[ApiController]
public class CategoryController : ControllerBase
{
public Category Get(int id)
{
return listofCategories[id];
}
}
}
Now let’s test and debug the code.
Once we begin debugging then we will move to Postman.
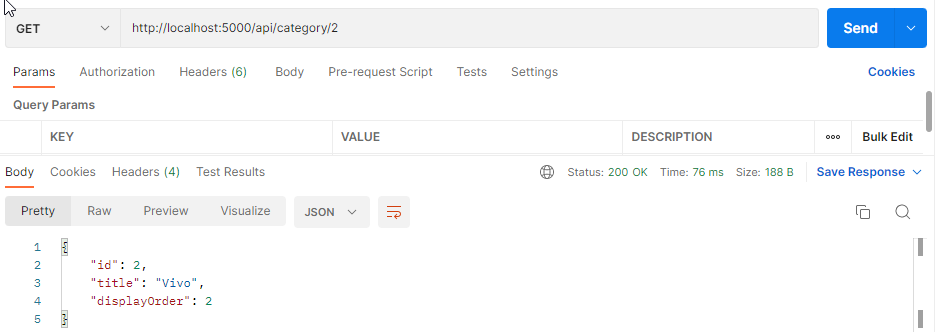
We will paste our URL just like this: http://localhost:5000/api/category/2.
Once we’ll Click theSendbutton. We’ll
receive an output like this:
Output:
POST Method with example:
POST Method: POST is a method for sending information to a server to add or update resources. Additional information is sent to the server using HTTP POST requests from the client (browser).
The most straightforward illustration is a website contact form. This information is included in the response body of the request and transmitted to the server when you complete the input fields of a form and click Send. There are many alternative formats, but JSON, XML, and query parameters are the most popular ones.
This is the way to add new data through the POST method.
"/api/category" POST --> Adding new category with JSON body containing new category information FORMBODY.
Code:
namespace WebApplication1.Controllers
{
[Route("api/[controller]")]
[ApiController]
public class CategoryController : ControllerBase
{
[HttpPost]
public void post([FromBody] Category category)
{
listofCategories.Add(category);
}
}
}
Now let’s test and debug the code.
Once we begin debugging, whatever data we have added in postman according to that we receive the data shown on the screen below:

Once we begin debugging then we will move to Postman.
Let’s move on to test API through Postman.
We will paste our URL just like this: http://localhost:5000/api/category.
Once we’ll Click theSendbutton. We’ll
receive an output like this:
Output:

After successfully inserting data output will be shown like this.
PUT Method with example:
PUT Method: PUT requests are used to submit data to the API to update or create resources, just as POST requests. PUT requests are idempotent, which is the difference. That is, executing the same PUT request more than once will always result in the same outcome. A POST request, on the other hand, can result in the creation of the same resource more than once.
This is the way to update existing data through the PUT method.
"/api/category/{categoryId}" PUT --> Update existing item with JSON body.
Code:
namespace WebApplication1.Controllers
{
[Route("api/[controller]")]
[ApiController]
public class CategoryController : ControllerBase
{
[HttpPut("{id}")]
public void put(int id, [FromBody] Category category)
{
listofCategories[id] = category;
}
}
}
Once we begin debugging, whatever we have made changes in postman according to that we get the data displayed on the screen below:

Once we begin debugging then we will move to Postman.
Let’s move on to test API through Postman.
We will paste our URL just like this: http://localhost:5000/api/category/4.
Once we’ll Click theSendbutton. We’ll
receive an output like this:
The result before any updates was displayed in that manner.
Output:
After updating our output is showing like this:
Output:
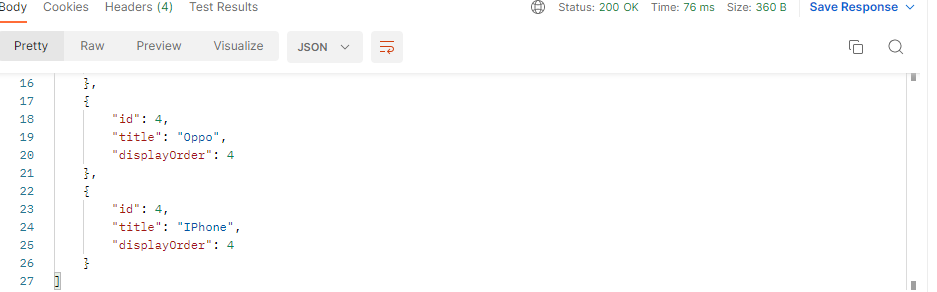
As we can see the Id – 5 and the title has also been updated to 4 with the title named “iPhone” using the PUT method.
DELETE Method with example:
DELETE Method: This function accepts an employee id as an argument, retrieves the employee from the list using the employee id provided by the client, removes the person from the list, and then provides the client a successful message along with a response.
This is the way to update existing data through the PUT method.
"/api/category/{categoryId}" DELETE --> Delete existing category item.
Code:
namespace WebApplication1.Controllers
{
[Route("api/[controller]")]
[ApiController]
public class CategoryController : ControllerBase
{
[HttpDelete("{id}")]
public void Delete(int id)
{
listofCategories.RemoveAt(id);
}
}
}
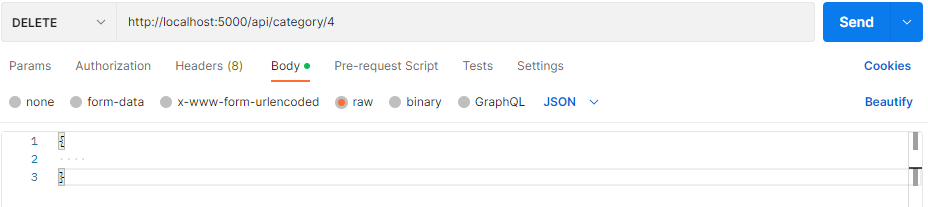
Let’s move on to test the API through Postman.
We will paste our URL just like this: http://localhost:5000/api/category/4.
Once we’ll Click theSendbutton. We’ll
receive an output like this:
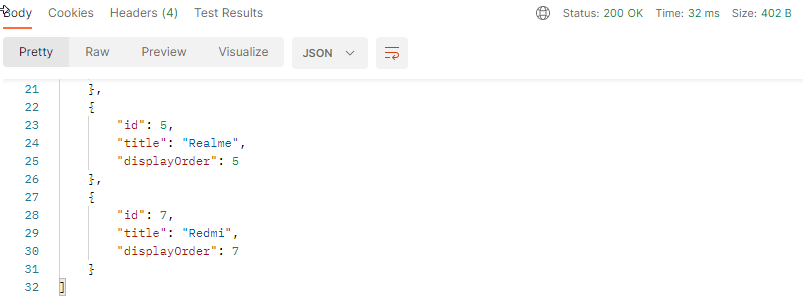
Output:
We were trying to delete a specific id according to the index number, here is the output for the same.
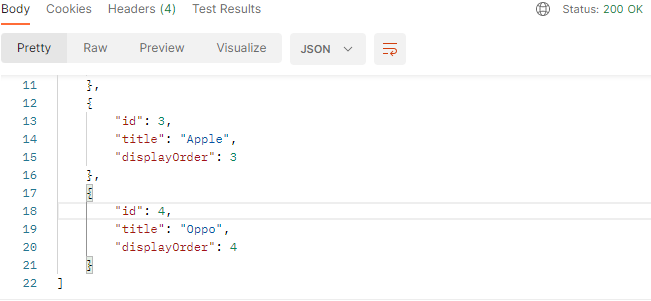
As we can see from the result described above, id-5 has already been deleted based on the index number, which was 4, and the title "iPhone." It has already been deleted.
After the brief discussion of different methods, Here is the full scenario of the Controller which is named Category Controller.
Category Controller :
using Microsoft.AspNetCore.Http;
using Microsoft.AspNetCore.Mvc;
using System.Collections.Generic;
using System.Linq;
using WebApplication1.Models;
namespace WebApplication1.Controllers
{
[Route("api/[controller]")]
[ApiController]
public class CategoryController : ControllerBase
{
public static List<Category> listofCategories = new List<Category>
{
new Category {Id = 1, Title = "Samsung", DisplayOrder = 1 },
new Category {Id = 2, Title = "Vivo", DisplayOrder = 2 },
new Category {Id = 3, Title = "Apple", DisplayOrder = 3 },
new Category {Id = 4, Title = "Oppo", DisplayOrder = 4 },
new Category {Id = 5, Title = "Realme", DisplayOrder = 5 }
};
// --- use of GET ---
[HttpGet]
public IEnumerable<Category> Get()
{
return listofCategories;
}
// --- use of specific GET Id ---
public Category Get(int id)
{
return listofCategories[id];
}
// --- use of POST ---
[HttpPost]
public void post([FromBody] Category category)
{
listofCategories.Add(category);
}
// --- use of PUT ---
[HttpPut("{id}")]
public void put(int id, [FromBody] Category category)
{
listofCategories[id] = category;
}
// --- use of DELETE ---
[HttpDelete("{id}")]
public void Delete(int id)
{
listofCategories.RemoveAt(id);
}
}
}
Conclusion :
Remember, always use the proper HTTP action in your Web API operations because this determines the kind of interactions that users of your app can have with it. Additionally, adhere to the standard definitions for each action and always provide the HTTP method(s) that the action can accept (e.g. GET for data retrieval, POST for creating data, PUT for updating data, DELETE for Deletion data, etc.).
This article described HTTP verbs in ASP.NET Core Web API step-by-step. I'm hoping it will be useful for newcomers and those studying ASP.NET Core Web API.
I sincerely hope you had fun and learned something from reading this article. Comment below with your ideas and suggestions.
Share This Post
Support Me